Posted on 1 Comment

A full baseline pipelined JPEG encoder in VHDL

As described in a previous post, a framework was built to loop in a DCT hardware design into a software JPEG encoder for verification (and acceleration) purposes.

Turns out this strategy speeds up development a lot, and that the remaining modules on the way to a full hardware based and pipelined JPEG encoding solution weren’t a big job. Actually, I was expecting that this enhanced encoder would no longer fit into a small Spartan3E 250k. Wrong!

Have a look:

Device utilization summary:
---------------------------

Selected Device : 3s250evq100-5 

 Number of Slices:                     1567  out of   2448    64%  
 Number of Slice Flip Flops:           1063  out of   4896    21%  
 Number of 4 input LUTs:               2915  out of   4896    59%  
    Number used as logic:              2900
    Number used as Shift registers:      15
 Number of IOs:                          49
 Number of bonded IOBs:                  47  out of     66    71%  
 Number of BRAMs:                        12  out of     12   100%  
 Number of MULT18X18SIOs:                11  out of     12    91%  
 Number of GCLKs:                         2  out of     24     8%

JPEG encoder latency and timing

From the XST summary, we get:

Timing Summary:
---------------
Speed Grade: -5

   Minimum period: 13.449ns (Maximum Frequency: 74.353MHz)
   Minimum input arrival time before clock: 9.229ns
   Maximum output required time after clock: 6.532ns
   Maximum combinational path delay: 7.693ns

The timing is again optimistic, place and route normally deteriorates the latencies. The maximum clock is in fact the clock you can feed the JPEG encoder with pixel data (12 bit) without causing overflow. The output is a huffman coded byte stream that is typically embedded into a JFIF structure header, table data and the appropriate markers by a CPU.

There is quite some room for optimization, in fact, the best compromise of BRAM bandwidth and area has not yet been reached. Quite a few BRAMs ports are not used, but kept open to allow access through an external CPU, like for manipulation of the Huffman tables.
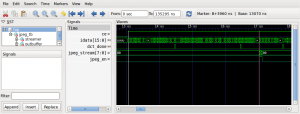
JPEG encoder waveforms

The last performance question might be the latency: how long does it take until encoded JPEG data appears after the first arriving pixel data? The above waveform snapshot should speak for itself: at 50MHz input clock, the latency is approx. 4 microseconds.

Colour encoding

We haven’t talked about colour yet. This is a complex subject, because there are many possibilities of encoding colour, but not really for the JPEG encoder. This is rather a matter of I/O sequencing and the proper colour conversion. As you might remember, a JPEG encoder does not encode three RGB channels, but in YUV space, which might be roughly described as: brightness, redness and blueness. The ‘greenness’ is implicitely included in this information. But why repeat what’s already nicely described: You find all the details right here on Wikipedia.

So, to encode all the colour, we just need properly separated data according to one of the interleaving schemes (4:2:0 or 4:2:2) and feed the MCU blocks of 8×8 pixels through the encoder while assserting the channel value (Y, Cb, Cr) on the channel_select input. Voilà.

Turns out that the Bayer Pattern that we receive from many optical colour sensors can be converted rather directly into YUV 4:2:0 space using the right setting four our Scatter-Gather unit (‘cottonpickens’ engine). With a tiny bit of software intervention through a soft core, we finally cover the entire colour processing stream. Proof below.

Colour JPEG
Colour JPEG output from the encoder
The original RGB photo

As you can see, the colours are quite not perfect yet compared with the original. This is a typical problem, that you get a greenish tint. We leave this to the colour optimization department 🙂

One more serious word: Just yesterday I’ve read the news and had to see that the person who changed the optical colour sensor industry, Bryce Bayer, has passed away. As a final “thank you” to his work, I’d like to post the Bayer Picture of the above.
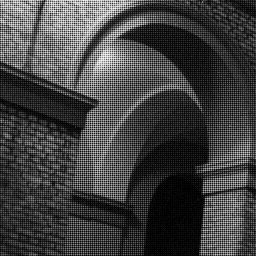
Bayer pattern source image
Dedicated to Bryce Bayer
Posted on Leave a comment

Virtual Hardware JPEG encoding

For a while I had been messing with various DSP architectures while playing with FPGA technology. So far both worlds were kinda separated in its own sandbox, the FPGA got to do really stupid interfacing and simple transforms while the DSP was doing the real complex encoding.
Now it’s time for a leap: Why not move some often used DSP primitives smoothly into the FPGA?
What kept me from doing it, were the tools. Most time is actually not burned on the concept or implementation, but on the debugging. Since the tools helping to debug would cost a fortune, it was just more economic to put a powerful chip next to the FPGA, even if it would have had the resources to run a decent number of soft cores in parallel.
Well, turns out somehow that in the development process of the past years, own tools can do. The ghdl extensions described here, allow to verify processing chains with real data just by replacing a hard VHDL FIFO module for data input by its virtual counterpart. This VirtualFIFO just runs in the simulation and can be fed from outside (via network) with data.

One good example of a complex processing chain is a JPEG encoder, which is typically implemented in software, i.e. as a serial procedure running on a CPU. If you’d want to migrate parts of the encoding such as the computationally expensive DCT into real parallel working hardware, the classical way could be to produce some number of offline data sets to run through the testbench (simulation) to verify the correct behaviour of your design.
But you could also just loop in the simulation into your software, in the sense of a “Software in the Loop” co-simulation.

Hacking the JPEG encoder

So, to replace the DCT of a JPEG routine using our DCT hardware simulation, we have to loop in some piece of code that implements our virtual DCT. We call it “remote DCT”, because the simulation could run on another machine. To speak to the remote DCT, we use the VirtualFIFO, which has a netpp interface, meaning, it can be accessed from the network.

The following python script demonstrates, how the remote DCT is accessed:

import netpp
d = netpp.connect("TCP:localhost")
r = d.sync()
buf = r.Fifo.Buffer
b = get_next_buffer()  # Example function returning a buffer
buf.set(b) # Send buffer b
rb = buf.get() # Get return buffer

The C version of this looks a bit more complicated, but basically makes API calls to netpp to transfer the data and wait for the return. This is simply the concept of swapping out local functions against remote procedure calls that are answered by the VHDL simulation.

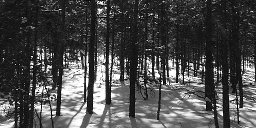
This way, we run our JPEG encoder with a black and white test PNG shown below:

Original PNG image
Original PNG image

Since the DCT is running in a hardware simulation and not in software, it is very slow. It can take minutes, to encode an image. However, what we can get from this simulation, is a cycle accurate waveform of things that are happening under the hood.

DCT encoder waveforms

After many hours of debugging and fixing some data flow issues, our virtual hardware does what it should.

Encoded JPEG image
Encoded JPEG image

And this is the encoded result. By swapping out the remoteDCT routine again by the built in routine, we get a reference image which we can subtract from the virtually hardware encoded image. If the result is all zeros, we know that both methods produce identical results.

Synthesis

Now the interesting part: How much hardware resources are allocated? See the synthesis results output below (This is for a Xilinx Spartan3E 250).

Typically, the timing results from synthesis can’t be trusted, when place & route has completed and fitted other logic as well, the maximum clock will significantly decrease. Since this design is using up all DSP slices on this FPGA, we’ll only see this as an intermediate station and move on to more gates and DSP power.

 Number of Slices:                      872  out of   2448    35%  
 Number of Slice Flip Flops:            623  out of   4896    12%  
 Number of 4 input LUTs:               1668  out of   4896    34%  
 Number of IOs:                          39
 Number of bonded IOBs:                  38  out of     66    57%  
 Number of BRAMs:                         6  out of     12    50%  
 Number of MULT18X18SIOs:                12  out of     12   100%     

 Timing constraint: Default period analysis for Clock 'clk'
 Clock period: 6.710ns (frequency: 149.032MHz)
Posted on

VHDL simulation remote display

In the previous article we described the netpp server enhancements to our GHDL based simulation to feed data to a FIFO. So we had condemned that extra thread being a slave listening to commands. But what if the GHDL-Simulation would be a netpp master?

Inspired by Yann Guidons framebuffer example at http://ygdes.com/GHDL/, the thought came up: why not hack a netpp client and use the existing ‘display’ device server (which we use for our intelligent camera remote display). What performance would it have?

For this, we extended our libnetpp.vhdl bindings by a few functions:

  • function device_open(id: string) return netpphandle_t — Opens a connection to a netpp (remote) device
  • function initfb(dev: netpphandle_t; x: integer; y: integer; buftype: integer) return framebuffer_t — Initialize virtual frame buffer from device
  • procedure setfb(fb: framebuffer_t; data: pixarray_t) — transfer data to framebuffer

Not to forget the cleanup functions device_close() and releasefb().

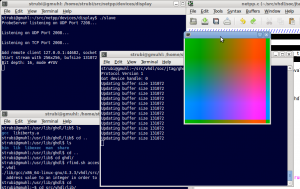
With this little functionality, we are running a little YUV color coded display as shown below:

Framebuffer output

It is very slow as  we keep repeatedly filling the YUV (more precisely UYVY interleaved data) using a clock sensitive process. We thus get a framerate of about 1fps – but it works!

The ghdlex source code is now hosted publicly at:

https://github.com/hackfin/ghdlex