MyHDL as of now provides a few powerful conversion features through AST (abstract syntax tree) parsing. So Python code modules can be parsed ‘inline’ and emit VHDL, Verilog, or … anything you write code for.
Using the pyoysis API, we can create true hardware elements in the yosys-native internal representation (RTLIL).
You can play with this in the browser without installing software by clicking on the button below. Note that this free service offered by mybinder.org might not always work, due to resource load and server availability.
![]()
Note:Maintenance for this repository is fading out. May no longer work using the Binder service.
Simple counter example
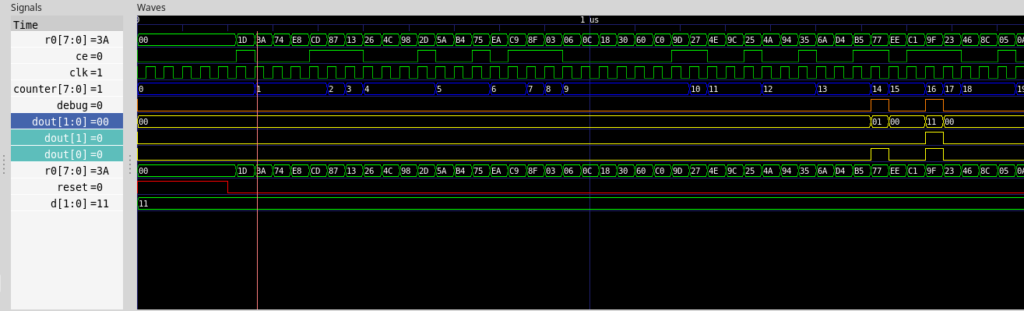
Let’s have a look at a MyHDL code snippet. This is a simple counter, that increments when ce is true (high). When it hits a certain value, the dout output is asserted to a specific value.
@block
def test_counter(clk, ce, reset, dout, debug):
    counter = Signal(modbv(0)[8:])
    d = Signal(intbv(3)[2:])

    @always_seq(clk.posedge, reset)
    def worker():
        if ce:
            counter.next = counter + 1

    @always_comb
    def assign():
        if counter == 14:
            dout.next = 1
            debug.next = 1
        elif counter == 16:
            debug.next = 1
            dout.next = 3
        else:
            debug.next = 0
            dout.next = 0

    return instances()
When we run a simple test bench which provides a clock signal clk, and some pseudo random assertion of the ce pin, we get this:
Now, how do we pass this simple logic on to yosys for synthesis?
Pyosys python wrapper
The pyosys module is a generated python wrapper, covering almost all functionality from the RTLIL yosys API. In short, it allows us to instanciate a design and hardware modules and add hardware primitives. It’s like wiring up 74xx TTL logic chips, but the abstract and virtual way.
Means, we don’t have to create Verilog or VHDL from Python and run it through the classic yosys passes, we can emit synthesizeable structures directly from the self-parsing HDL.
Way to synthesis
Now, how do we get to synthesizeable hardware, and how can we control it?
We do have a signal representation after running the analysis routines of MyHDL. Like we used to convert to the desired transfer language, we convert to a design, like:
design = yshelper.Design("test_counter")
a = test_counter(clk, ce, reset, dout, debug)
a.convert("verilog")
a.convert("yosys_module", design, name="top", trace=True)
design.display_rtl() # Show dot graph
The yosys specific convert function, as of now, calls the pyosys interface to populate a design with logic and translates the pre-analysed MyHDL signals into yosys Wire objects and Signals that are finally needed to create the fully functional chain of the logic zoo. The powerful ‘dot’ output allows us to look at what’s being created from the above counter example (right click on image and choose ‘view’ to see it in full size):
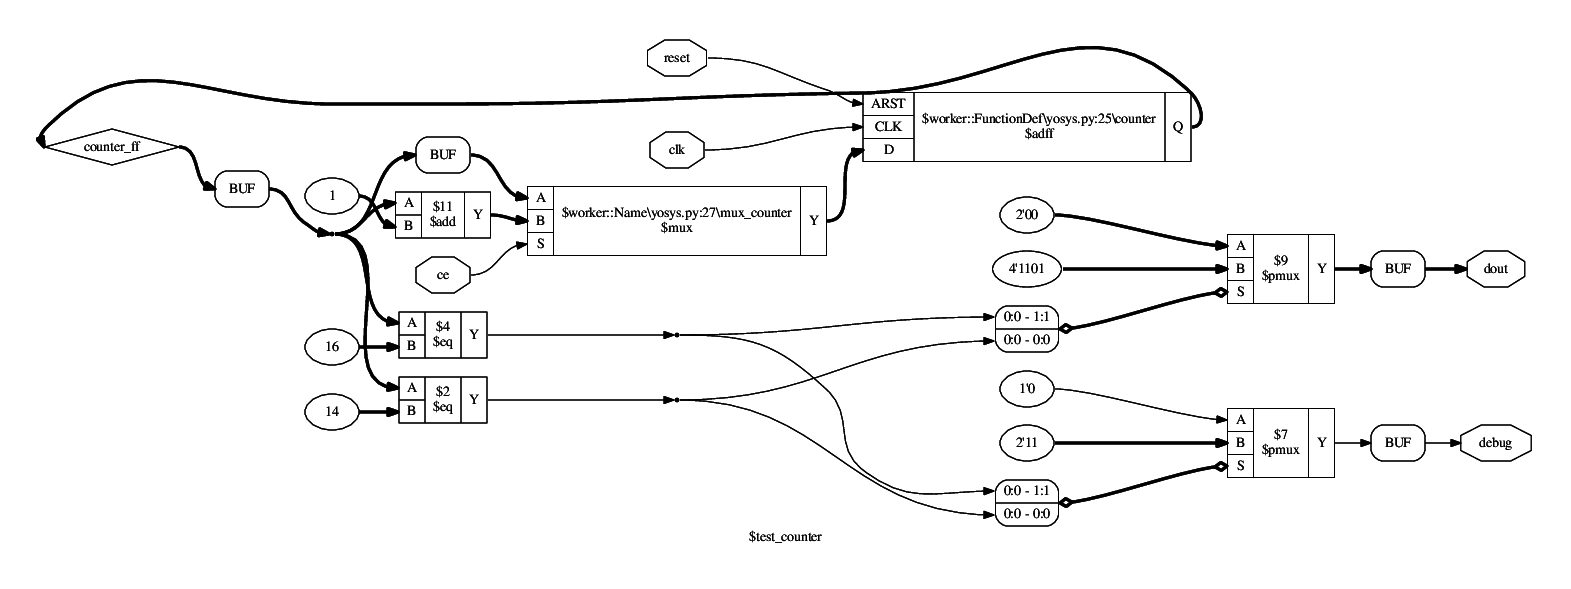
You might recognize the primitives from the hardware description. A compare node if counter == 14 translates directly to the $eq primitive with ID $2. A Data flip flop ($dff) however is generated somewhat implicit by the @always_seq decorator from the output of a multiplexer. And note: This $dff is only emitted, because we have declared the reset signal as synchronous from the top level definition. Otherwise, a specific asynchronous reset $adff would be instanciated.
The multiplexers finally are those nasty omnipresent elements that route signals or represent decisions made upon a state variable, etc.
You can see a $mux instanciated for the reset circuit of the worker() function, appended to another $mux taking the decision for the ce pin whether to keep the counter at its present value or whether to increment it ($11). The $pmux units are parallel editions that cover multiple cases of an input signal. Together with the $eq elements, they actually convert well to a lookup table — the actual basic hardware element of the FPGA.
Hierarchy
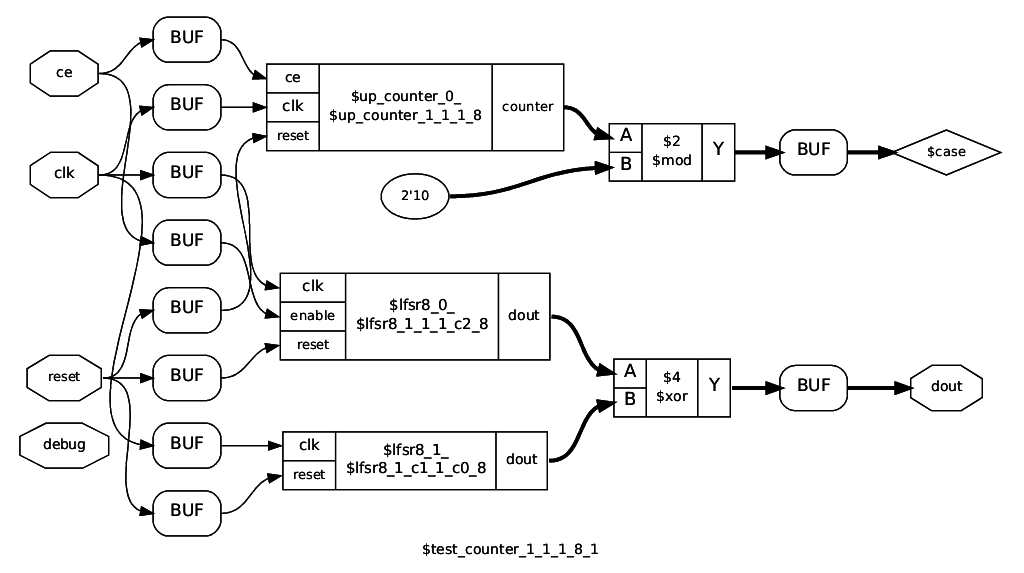
The standard VHDL/Verilog conversion flattens out the entire hierarchy before conversion. This approach avoids this by maintaining a wiring map between current module implementation and the calling parent. Since @block implementations are considered smart and can have arbitrary types of parameters (not just signals), this is tricky: We can not just blindly instance a cell for a module and wire everything up later, as it might be incompatible. So we determine a priori by a ‘signature key’ if a @block instance is compatible to a previous instance of the same implementation.
All unique module keys are thus causing inference of the implementation as a user defined cell. The above dot schematic displays the top level module, instancing a counter and two LFSR8 cells with different startup value and dynamic/static enable.
Black boxes
When instancing black box modules or cells directly from MyHDL, you had to create a wrapper for it, using the ugly vhdl_code or verilog_code attribute hacks. This can be a very tedious process, when you have to infer vendor provided cells. You could also direct this job to the yosys mapper. The following snippet demonstrates an implementation of a black box: the inst instance adds the simulation for this black box, however, the simulation is not synthesized, instead, the @synthesis implementation is applied during synthesis. Note that this can be conditional upon the specified USE_CE in this example.
@blackbox
def MY_BLACKBOX(a, b, USE_CE = False):
    "Blackbox description"
    inst = simulate_MY_BLACKBOX(a, b)

    @synthesis(yshelper.yosys)
    def implementation(module, interface):
        name = interface.name
        c = module.addCell(yshelper.ID(name), \
            yshelper.ID("blackbox"))
        port_clk = interface.addWire(a.clk)
        c.setPort(yshelper.PID("CLK"), port_clk)

        if USE_CE:
            port_en = module.addSignal(None, 1)
            in_en = interface.addWire(a.ce)
            in_we = interface.addWire(a.we)
            and_inst = module.addAnd(yshelper.ID(name + "_ce"), \
                in_en, in_we, port_en)
        else:
            port_en = interface.addWire(a.we)

        c.setPort(yshelper.PID("EN"), port_en)

    return inst, implementation
This also allows to create very thin wrappers using wrapper factories for architecture specific black boxes. In particular, we can also use this mechanism for extended High Level Synthesis (HLS) constructs.
Verification
Now, how would we verify if the synthesized output from the MyHDL snippet works correctly? We could do that using yosys’ formal verification workflow (SymbiYosys), but MyHDL already provides some framework: Co-Simulation from within a python script against a known working reference, like a Verilog simulation.
These verification tests are run automatically upon checkin (continuous integration, see also docker container hackfin/myhdl_testing:yosys)
An overview of the verification methods are given inside the above binder. Note: the myhdl_testing:yosys container is not up to date and is currently used for a first stage container build only.
Functionality embedded in the container:
- Functional MyHDL simulation of the unit under test with random stimulation
- Generation of Verilog code of the synthesized result
- Comparison of the MyHDL model output against the Verilog simulation output by the cycle-synchronous Co-Simulation functionality of MyHDL
There are some advantages to this approach:
- We can verify the basic correctness of direct Python HDL to yosys synthesis (provided that we trust yosys and our simulator tools)
- We can match against a known good reference of a Verilog simulator (icarus verilog) by emitting Verilog code via MyHDL
- Likewise, we can also verify against emitted VHDL code (currently not enabled)
Synthesis for target hardware (ECP5 Versa)
Currently, only a few primitives are supported to get a design synthesized for the Lattice ECP5 architecture, in particular the Versa ECP5 development kit. The following instructions are specific to a Linux docker environment.
First, connect the board to your PC and make sure the permissions are set to access the USB device. Then start the docker container locally as follows:
docker run -it --rm --device=/dev/bus/usb -p 8888:8888 hackfin/myhdl_testing:jupyosys jupyter notebook --ip 0.0.0.0 --no-browser
Then navigate to this link (you will have to enter the token printed out on the console after starting the container):
http://127.0.0.1:8888/notebooks/src/myhdl/myhdl-yosys/example/ipynb/index.ipynb
Then you can synthesize, map, run PnR and download to the target in one go, see the ECP5 specific examples in the playground.
Note: when reconnecting the FPGA board to Power or USB, it may be necessary to restart the container.
Status, further development
MyHDL main development has turned out to have some more serious issues:
- Numerous bugs and piling up pull requests
- Architectural issues (AST parsing versus execution/generation), problematic internals for hierarchy preservation
- Slow execution for complex hierarchies
- No closed source modules feasible
From more experiments with a different approach, the roadmap has become clearer such that all yosys related direct synthesis support is migrated to the new ‘v2we’ kernel which provides some MyHDL emulation. For the time being, the strategy is to go back to VHDL transfer and verification using GHDL to make sure the concept is sound and robust. Link to prototype examples: