Posted on 2 Comments

CCS811 sensor review

CCS 811 sensor drifting

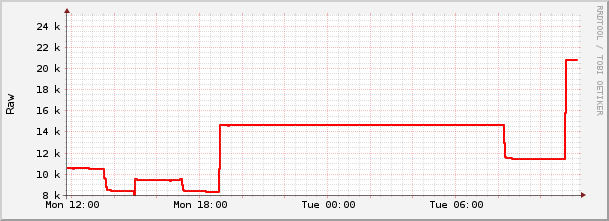
I’ve logged the CCS811 eCO2 values over 24 h, using the 10s acquisition PULSE mode of the MEAS_MODE.DRIVE_MODE register bit field. It looks like the internal algorithm is not so well able to cope with humidity changes, as soon as humidity drops (when opening a window), the eCO2 values start drifting. The hardware/firmware specs:

HW_VERSION 0x12
FW_APP_VERSION 0x1100

The air quality in the room is somewhat constant and should normally range between 400 and 800 ECO2 pseudo-ppm.

In the examples below, no environmental on-sensor compensation (using the ENV_DATA register) is used.

In all cases where too much drifting was registered, the sensor DRIVE_MODE was reset to Pulse (2). You can then also see that the RAW value is then at a different offset.

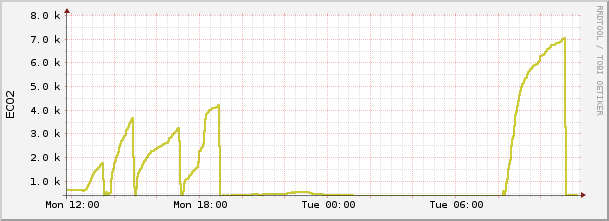
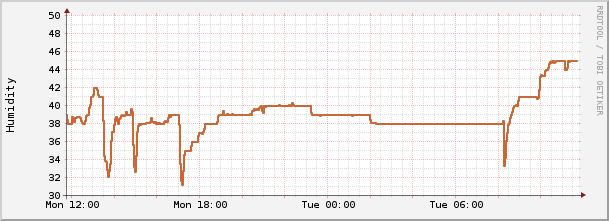
The sudden humidity changes seem to be problematic, obviously. Since the raw values don’t change much during the continuous measurement interval (without restarting/rewriting DRIVE_MODE) , this would suggest that the firmware is somewhat mislead and keeps adapting its values.

The app note AN369 mentions the handling of the BASELINE register in paragraph 17. This is to be experimented with next.

T/H Environment compensation

The Write-Only (!) ENV_DATA register should, according to the HW reference, allow compensation of the humitidy. However, first attempts made the measurements go completely haywire and oscillating. This is currently under scrutiny.

It looks like that only a more or less constant humidity makes the sensor operate in a sane range. Otherwise, the high eCO2 values can not be trusted whenever the humidity rises rapidly. I guess this is a somewhat unwanted property of any SnO2 gas sensor and it can be quite difficult to adjust without knowing the parameters. However in this case it seems that the firmware is doing some internal adjustment that is still somewhat not understood.

Baseline adjustment

The BASELINE register is somewhat obscure and undocumented: Some MSBs seem to be flags, the LSB some offset value. The AN tells you to just write back a ‘known’ baseline from clean air. However, I’d assume that for a proper measurement you’d have to record a set of baselines corresponding to environment T/H values to figure out which to write. Not there yet…

Conclusion / possible way out

Whenever the humidity is changing rapidly, the current strategy is:

  • Wait until humidity has settled and try resetting the BASELINE to a ‘known good’ state
  • Rewrite DRIVE_MODE to the previous value and wait a certain settling time

Resetting the baseline according to the AN sometimes works, sometimes produces completely unusable results. It is still a bit of a mystery why the ENV_DATA compensation does not work as ‘promised’.

I’ll probably post more findings here.

Posted on Leave a comment

Multiple node monitoring/control via Python/netpp

Since scalability of the netpp node solution was advertised, one issue has turned into a FAQ: How to handle errors on loaded networks and traffic between multiple nodes?

Especially with UDP, plenty of scenarios can occur which can confuse all higher protocol layers: lost packets, reverse packet order, duplicate packets…

How to handle these errors, does the netpp layer take care of it all?

It doesn’t. The current strategy with UDP is: We want to see all errors. If we don’t, we’d rather switch to a TCP implementation.

In our test scenario we have, connected by a Gigabit Hub:

  • One Gigabit Ethernet capable client, one 100M client
  • Six netpp nodes

If the network is not completely jammed, the usual you would see is timeouts. In Python, these are simple IOError exceptions. If an illegal packet sequence is detected, a SystemError exception will be raised.

As a simple example, the script below will poll all detected hosts at highest frequency possible and cover IOError and SystemError exceptions with different recovery timings.

Note that there is no particular finer control for specific errors in Python. If required, these have to be handled on the C-API level.

import netpp
import time
import sys


hostlist = range(8, 15)


def init(hostlist):
    targets = []
    for h in hostlist:
        try:
            ip = "192.168.0.%d" % h
            d = netpp.connect("UDP:%s:2016" % ip)
            print "Target %s alive" % ip
            targets.append((h, d.sync()))
        except:
            print "Target %s down" % ip
            pass
        
    return targets


def poll(targets):
    for h, t in targets:
        rev = t.SysCtrl.ReleaseTag.get()
        print "Node %d : Class '%s' rev %s" % (h, t.name(), rev)
        l = t.LED.Red.get()
        l = not l
        t.LED.Red.set(l)
        print 40 * "-"

    l = True
    while 1:
        for h, t in targets:
            try:
                t.LED.Green.set(l)
                dataready = t.UART.RXREADY.get()
                if dataready:
                    print "> %s" % t.UART.RxData.get()
            except SystemError:
                print "Node %d: %s" % (h, sys.exc_info()[1])
                time.sleep(1.0)
            except IOError:
                print "Node %d: %s" % (h, sys.exc_info()[1])
                time.sleep(0.1)
        l = not l
        # time.sleep(0.05)

targets = init(hostlist)
poll(targets)

Script details

The script will just toggle the Green LED for each target and check if there’s input available on the UART. If you have the corresponding netpp node connected via USB serial, you can type in a character at the terminal and see it reported from the script.

Timeouts and sessions

UDP is session-less, therefore netpp handles the connectivity from peer to peer. By default, only two simultaneous connections (two clients) are supported. If a connection is lost, the netpp node will terminate it after a certain timeout, if a new connection is detected. This is signalled on the netpp node UART console by:

disconnect_timeout: c0a80002:49587

If the connection is lost from the netpp node side, for example via a reboot or long cable disconnect, the client may not detect that and keep sending queries. In this case, you might see the following error on the netpp node console:

QRY 55 NAK

(the 55 could be any other code).

In this case, the session would have to be reopened from the client:

d = netpp.connect(...)

FPGA goes cloudy

If you’re collecting data as simple as Temperature and Humidity, for instance, you might want to push the data to the cloud. This is also done using a simple Python script doing a HTTP get request to ThinkSpeak. Note the netpp node does not push the data, the script is running on an embedded Linux module.

[iframe_loader src=”https://thingspeak.com/channels/415371/charts/1?bgcolor=%23ffffff&color=%23d62020&dynamic=true&results=60&type=line&update=15″]
[iframe_loader src=”https://thingspeak.com/channels/415371/charts/2?bgcolor=%23ffffff&color=%23d62020&dynamic=true&results=60&type=line&update=15″]

Posted on 2 Comments

netpp for Windows quick start

Here’s a short step by step intro to install and run netpp on Windows10 (it will work likewise on older Windows versions):

  1. Download Python 2.7 (32 bit) and install it. Make sure to install for all users, otherwise the netpp installer will not find the Python directory and complain.
  2. Download and run:
    [sdm_download id=”1349″ fancy=”1″]
  3. Run the example server via Start Menu->netpp->Run example server. A warning will appear and request you to unblock the service, possibly. Then, a small example netpp server is listening on your local machine.
  4. Start the IDLE environment via Start Menu->Python 2.x->IDLE. Read more in detail below…

If you did not download Python before installing netpp, the netpp installer will throw a warning, but still continue.

First steps

Windows10 netpp session

When you have started IDLE, first try to import the netpp module as shown in the screen shot. Then make a connection to your local example server using the .connect() method.

The .sync() command creates a local property tree with root node ‘r’. When first called, the device server is queried for all available properties, so this can take a long time on some systems. Once the query has completed, the tree is stored in a cache and is only reloaded, if the device properties have changed.

Note the message “using PWD for storage”. If you have no cache directory created, the cache will be installed in the current program’s working directory, which may not be desired. Create the folders ‘.netpp/cache’ in your home directory, then the warning will go away. If you ever need to manually delete the cache files, you will find them there.

Next, we are going to look at the properties. This is simply done the pythonish way using ‘dir’.

And last, we obtain a property value using the .get() method. Simple as that.

Using the Power shell

There are two command line utilities:

  • master: Simple command line demo tool for netpp access
  • netpp-cli: interactive netpp client

Open up a Power shell (or a legacy cmd.exe) and change directory to where your netpp binaries are installed, like

cd c:\Program Files (x86)\section5\netpp\bin

The master.exe is a very primitive command line tool for netpp device query. When run without arguments, it will display the available hubs and send out a broadcast on the local network for attached netpp devices. If your example server is running, you will see it listed. Try accessing it:

.\master TCP:192.168.56.1

and it will list the device’s properties.

The netpp-cli.exe is an interactive console with a bit more caching functionality and session character, i.e. when you made a connection, the device will reserve a session with you until you exit the CLI. This operation mode may be required on some more complex devices that work session based.

Make a connection to a device:

.\netpp-cli TCP:192.168.56.1

At the netpp prompt, type ‘?’. Now you can just get a property value by typing its property name, like Container.Test. When you append a value, you can change a property, likewise.

Process viewer/browser support

To use the predefined GUI process control based on the free pvbrowser (see github repository), you need a demo setup based on a modhub or another Linux embedded demo setup running a pvhub server. This assumes a netpp node setup with default design.

  1. Start the pvbrowser on your PC
  2. Enter the URL
    pv://modhub/netpp:UDP:192.168.0.5:2016

    into the pvbrowser for a direct connection to the netpp node (assuming default IP at 192.168.0.5). Replace ‘modhub’ by the IP address of your pvhub server host.

  3. The process viewer should display something like below:
PVbrowser netpp node v0
PVbrowser netpp node example

Troubleshooting

There are some known issues with the evaluation release netpp 0.5-rc1 on Windows and IDLE:

  • When a cache directory was not created ($HOME\.netpp\cache), Python(IDLE) will report:
    C:\Users\me\/.netpp/cache not found, using PWD for storage

    This is mostly not a problem, however when access rights are limited, creating the cache can fail. Create this directory in your $HOME then.

  • Upon synchronization, a failure can occur when a cache created from an older netpp version is found:
    r = a.sync()
    
    ...
    
    IndexError: tuple index out of range

    Search for the corresponding *.pyp file and remove it

Further resources:

LabVIEW wrapper based on OpenG LabPython
  • LabVIEW project build (testing): [sdm_download id=”1444″ fancy=”0″]
Documentation:
  • netpp HOWTO: [sdm_download id=”1350″ fancy=”0″]
  • API reference OpenSource v0.3x [ HTML ]